Polyethylene vs Reinforced vs Heavy-Gauge Crawl Space Vapor Barriers: A Charleston Guide
If your hallway floor feels bouncy and a friend just told you the joists might be rotting from moisture, the material sitting on your crawl space dirt matters more than you think. Choosing between polyethylene, reinforced, and heavy-gauge crawl space liners is the decision that determines whether your fix lasts two years or twenty. A crawl space liner comparison reveals that cheap 6 mil plastic sheeting fails fast in Charleston's humidity, high water tables, and flood-prone soil. This guide walks you through picking and installing the right barrier, step by step, so the moisture problem under your floors gets fixed once.
The stakes are not small. According to the American Society of Home Inspectors, more than 60% of U.S. homes have had water or moisture problems in their basement or crawl space. In Charleston, with its raised pier-and-beam homes and tidal lots, that number feels low. NOAA Tides and Currents recorded 17 high-tide flood days here in the 2023-24 meteorological year. Ground moisture is not an occasional problem in the Lowcountry. It is the baseline condition your barrier has to beat.
Step 1: Learn What Separates Polyethylene, Reinforced, and Heavy-Gauge Options
Before you buy anything or sign a quote, understand the three material tiers, because they are not interchangeable.
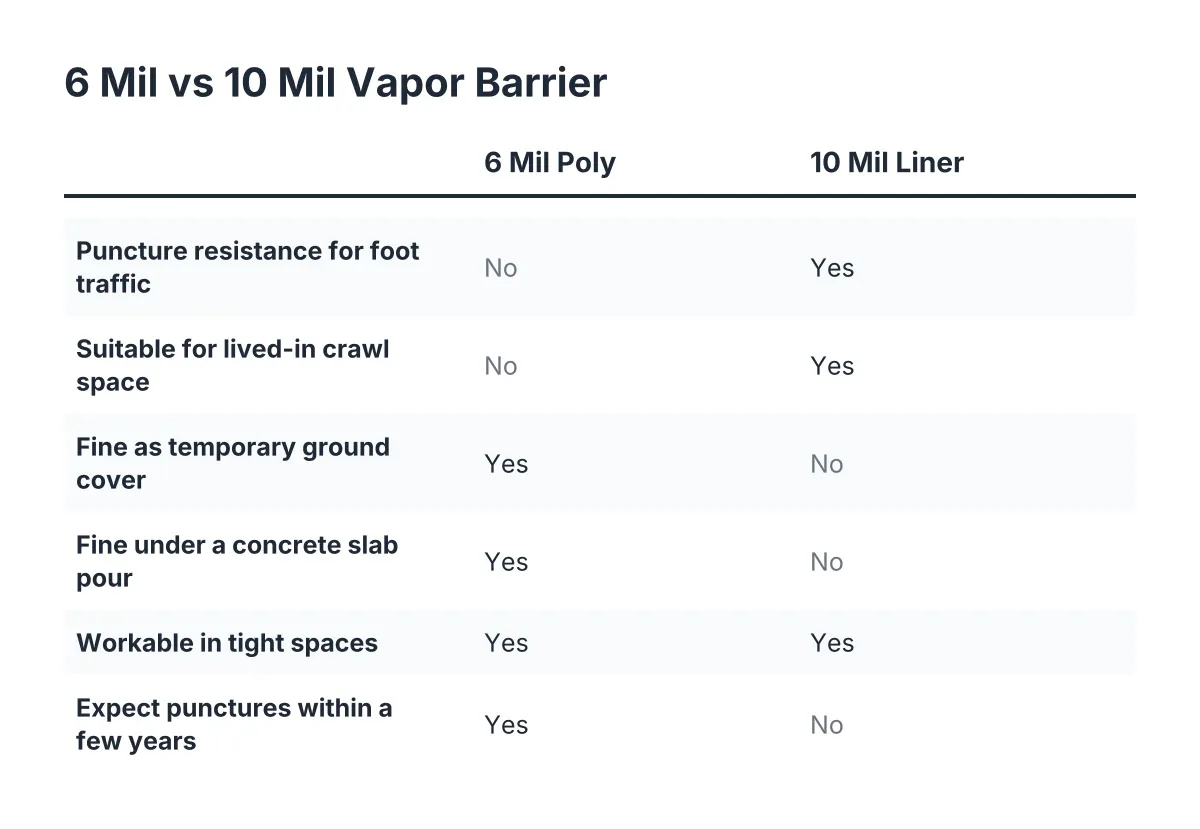
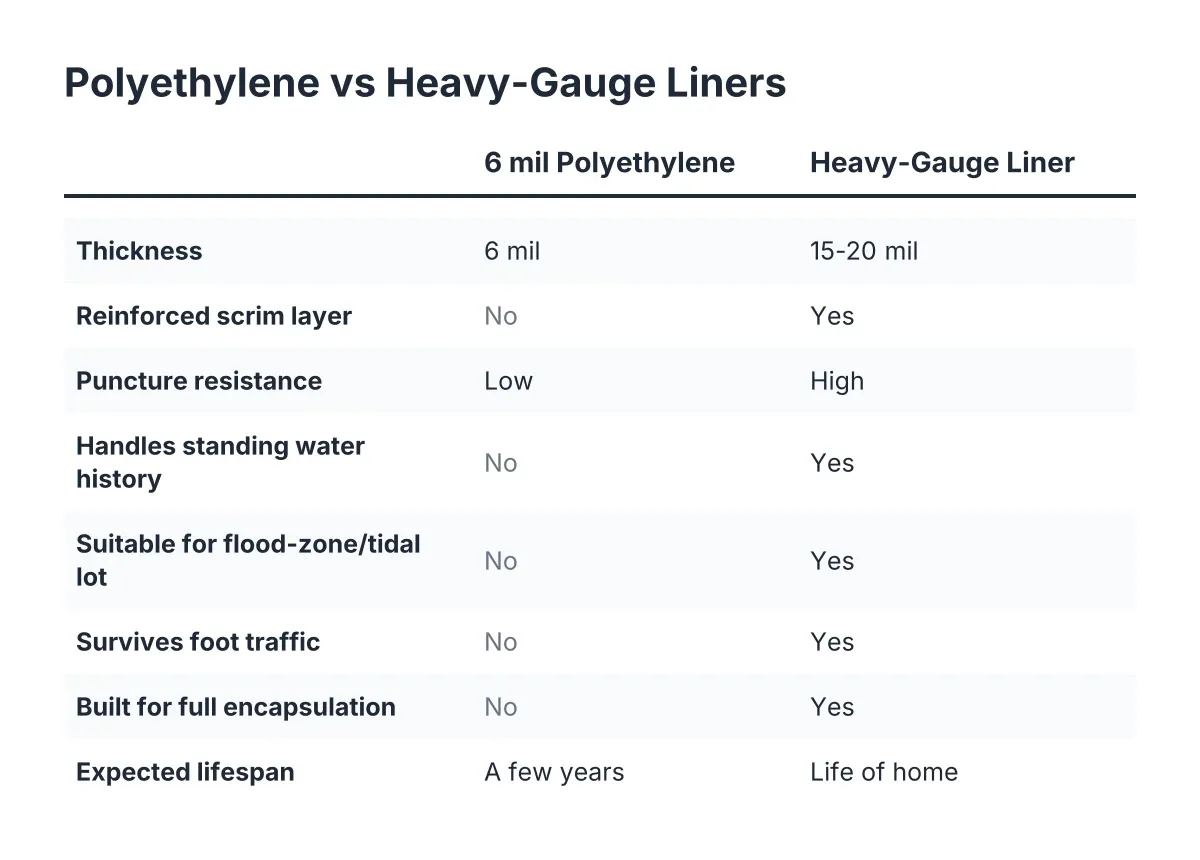
Standard polyethylene. This is the clear or black 6 mil polyethylene vapor barrier sold in rolls at any hardware store. It is the same vapor barrier plastic sheeting builders lay under a vapor barrier concrete slab pour, where it sits protected forever. On open crawl space dirt, it is exposed to rocks, debris, and knees. It punctures easily, tears at the seams, and degrades. In a humid, flood-zone Charleston crawl space, plain 6 mil is a temporary patch, not a fix.
String-reinforced polyethylene. These liners sandwich a woven cord grid, called scrim, between layers of poly. The scrim stops a small tear from running across the whole sheet. A 10 to 12 mil reinforced liner handles far more abuse than plain plastic at a similar thickness.
Heavy-gauge liners. These are 15 to 20 mil products manufactured specifically for crawl space encapsulation, usually with reinforcement built in. They resist punctures from gravel and debris, which matters more than tensile strength; the liner needs to survive a technician crawling across it, not stretching. This is the tier used when the barrier is expected to last the life of the home.
Here is the practical takeaway: when conducting a crawl space liner comparison, puncture resistance, not thickness alone, is what keeps a barrier working. A reinforced 12 mil liner often outlasts an unreinforced 20 mil sheet on rough ground.
Step 2: Inspect the Barrier You Have Now
Get a flashlight and look through the crawl space access door, or send someone in. You are checking whether your current crawl space vapor barrier is doing its job, or whether there is one at all. About 15% of American homes sit on a crawl space foundation, according to JSE Labs, and many older Charleston homes have either bare dirt or a shredded sheet of plastic down there.
Look for these failure signs:
- Tears, holes, or sections pulled away from piers and walls
- Plastic that stops short of the walls, leaving exposed dirt at the perimeter
- Condensation beading on the underside of the liner or on joists above it
- Standing water or dark, damp soil on top of the plastic
- A musty smell rising through the floors, especially after rain or a king tide
- White fuzzy growth or dark staining on wood framing
If your floors already feel soft or sagging, note where. A bouncy hallway often sits directly above rotted joists or a failing beam, and no liner fixes wood that has already lost its strength. Moisture control stops the rot from continuing; structural support fixes what the rot already damaged. You may need both.
Step 3: Match the Material to Your Crawl Space Conditions
Now decide which tier your situation demands. Be honest about the conditions, because Charleston soil does not forgive optimism.
Choose plain 6 mil polyethylene only if the crawl space is dry, the soil is smooth, nobody will ever crawl on it, and you accept replacing it in a few years. In practice, that describes almost no Lowcountry crawl space.
Choose a reinforced 10 to 12 mil liner if the ground has some gravel or debris, the space gets occasional foot traffic for HVAC or plumbing access, and moisture is moderate. The scrim layer earns its cost the first time someone drags a dehumidifier across the floor.
Choose a heavy-gauge 15 to 20 mil liner if any of these apply: standing water history, a flood-zone or tidal lot, planned full encapsulation, or a pending home sale where the buyer's inspector will crawl every foot of it. For the Pre-Sale Fixer with a closing date and an inspection report naming the crawl space, heavy-gauge is the tier that survives a re-inspection.
One nuance from how crews actually work: walls and floors can use different weights. Wall liner is often thinner and more pliable because it has to conform to block and brick, while the floor takes the heavier product that absorbs the abuse. A good installer specifies both, not one roll for everything.
Step 4: Remove the Old Barrier, Do Not Bury It
It is tempting to roll new plastic over the old sheet and call it done. Resist that. Old liners can hold bacteria and residue from past plumbing leaks, and sealing that material under a new layer traps it. The result is an odor problem that shows up weeks later and is expensive to chase. Layered plastic also holds moisture between sheets, which defeats the point.
Therefore, the correct sequence is: pull the old plastic, haul out debris, and start on clean, graded soil. If the crawl space has construction scraps, fallen insulation, or animal debris, cleanup and debris removal comes first. Grading matters too; leveling the dirt and sloping it slightly toward a perimeter drain helps water reach a sump pump instead of pooling in the middle, per guidance from the Building America Solution Center.
Step 5: Install the Liner Like an Encapsulation, Not a Drop Cloth
The material only performs as well as the installation. According to the U.S. Department of Energy, proper encapsulation runs the sheeting across the entire floor and seals it to the stem walls and around support piers, rather than laying plastic loosely on the ground. That sealing detail is the difference between a vapor barrier and a tarp.
Follow this sequence:
- Pre-cut sections outside. Measure the crawl space and cut the liner in your driveway or yard. Wrestling a 12-foot roll in a 30-inch space wastes hours and tears material.
- Wrap the piers first. Cut collars for each pier, seal them with the manufacturer's seam tape, then run floor panels up to them.
- Overlap seams generously and tape every one. Use tape made for crawl space liners, not duct tape. Duct tape adhesive fails in humidity within a season.
- Run the liner up the stem walls and mechanically fasten it, then seal the top edge. Leave a termite inspection strip near the top of the foundation wall uncovered; Stego Industries notes some states require this gap, so check local code before sealing to the sill.
- Add drainage and dehumidification where conditions call for it. On wet lots, a perimeter drain to a sump pump goes in before the liner. A crawl space dehumidifier keeps humidity in check once the ground moisture is sealed off.
For a homeowner comfortable with tight spaces, a small dry crawl space with a reinforced liner is a realistic DIY weekend. However, call a professional if you have standing water, visible mold on framing, sagging floors, or a closing deadline. Mold remediation, drainage systems, and beam repair are not DIY territory, and a botched seam job fails exactly where you cannot see it.
Step 6: Address the Structure Before You Seal It In
Suppose a homeowner in West Ashley notices a soft spot in the hallway, and an inspection finds two joists rotted at a beam over damp soil. Sealing a heavy liner over that ground stops future moisture, but the floor keeps sagging until the wood is sistered or replaced and a support jack goes under the beam. In that scenario, the right order is structural support first, then the liner, so no one has to cut a finished encapsulation to make repairs.
This is also where the honest budget conversation happens. A liner-only job and a full encapsulation with drainage, dehumidification, and structural repair are different projects at different price points. Get an inspection that separates the moisture problem from the structural problem in writing, so you know which fix you are actually paying for. A second opinion is reasonable, and a fair contractor will not flinch at it.
Step 7: Vet the Installer on Material, Seams, and Scope
If you hire the work out, three questions expose most weak quotes:
- What mil and construction is the floor liner, and is it reinforced? "Heavy plastic" is not an answer. You want a named thickness and crawl space liner comparison details for a polyethylene, reinforced, or heavy-gauge product, in writing.
- How are seams, piers, and walls sealed? Listen for seam tape rated for the liner, mechanical fastening at the walls, and sealed pier wraps. Loose overlaps mean the humidity gets in anyway.
- What is included beyond the plastic? Old barrier removal, debris haul-off, grading, drainage, dehumidifier, and any joist or beam work should each appear as line items. Vague scopes hide either shortcuts or surprise charges.
For 2026 projects tied to a home sale, also ask how the finished work will be documented for the buyer's agent. Photos of sealed seams, the pier wraps, and the dehumidifier setup can keep a deal moving without a second crawl-through.
One trade-off worth knowing: heavy fiber-reinforced liners are petroleum products and can give off a plastic odor for a short period after installation. It fades, and a dehumidifier with air movement speeds that up, but do not mistake it for a mold problem in week one.
The Bottom Line for Charleston Crawl Spaces
Plain polyethylene is a slab product; it belongs under concrete, not on open Lowcountry dirt. Reinforced liners are the working minimum for a damp Charleston crawl space, and heavy-gauge encapsulation liners are what hold up on flood-prone lots and under real foot traffic. Whatever tier you choose, the removal of the old plastic, the sealed seams, and the structural repairs underneath decide whether the job lasts.
If your floors are moving, or an inspection report is standing between you and a closing date, start with a crawl space inspection that tells you plainly what is moisture, what is structure, and what each will take to fix. Low Country Crawl Space Repair inspects, encapsulates, and repairs crawl spaces across Charleston and its surrounding communities, and can give you a written scope with the exact liner spec, seam method, and any structural work called out line by line. Reach out to schedule an inspection and get a straight answer before the problem gets bigger.
If you need crawl space encapsulation, Low Country Crawl Space Repair can help.
Prefer to talk it through? Call +18542013678 — a quick call is usually the fastest way to get a straight answer for your situation.