
Crawl Space Vapor Barrier — Complete Guide
Under thousands of Charleston homes, a sheet of plastic on the dirt is the only thing standing between the ground and the wood framing above it. That sheet is your crawl space vapor barrier, and in the Lowcountry it works harder than almost anywhere else in the country. This guide explains what a vapor barrier actually does, which materials and thicknesses hold up in coastal humidity, and how to tell whether the moisture barrier under your home is doing its job or quietly failing. You will also find links to deeper guides on materials, mil thickness, cost drivers, and installation so you can go as far into the details as you want.
What You'll Find in This Guide
- Polyethylene vs Reinforced vs Heavy-Gauge Crawl Space Vapor Barriers: A Charleston Guide
- Crawl Space Vapor Barrier Terms Explained: A Plain-English Glossary
- Crawl Space Vapor Barrier Installation in Charleston, SC
- How Much Does Crawl Space Vapor Barrier Cost?
- 6 Mil vs 10 Mil Vapor Barrier: What Actually Holds Up in a Charleston Crawl Space
Prefer to have a pro handle it? Crawl space vapor barrier installation is one call away.
What a Vapor Barrier Does Under a Charleston Home
A vapor barrier is a heavy plastic liner laid over exposed soil in your crawl space. It blocks moisture from evaporating upward into your home, where it would condense on joists, subflooring, ductwork, and insulation—feeding wood rot, musty odors, and mold growth.
Charleston amplifies this problem. The Lowcountry sits on a high water table, and many lots occupy or near flood zones. According to NOAA Tides and Currents, Charleston recorded 17 high-tide flood days during 2023–24. When tidal and storm water saturates foundation soil, ground moisture persists for weeks, rising through the crawl space.
Historic Charleston's pier-and-beam construction heightens the stakes. Foundation vents, designed to dry crawl spaces, actually pull humid coastal air in during summer, where it condenses on cooler surfaces below the floor. A vented Charleston crawl space with bare dirt often runs wetter than outside air.
This is not rare. More than 60% of U.S. homes have experienced water or moisture problems in basements or crawl spaces, according to the American Society of Home Inspectors. In our climate, the question isn't whether ground moisture reaches your framing—it's how much and what slows it down.
When gathering quotes, you'll encounter terms like "mil," "perm rating," "seam overlap," and "mechanical fastening." Review a plain-English glossary of vapor barrier terms before comparing bids so the paperwork makes sense. A quote only provides useful information when you understand each line item.
Materials and Mil Thickness: Where Cheap Plastic Fails First
Walk into any hardware store and you can buy a roll of 6-mil polyethylene for very little money. It looks like a ground moisture liner. On paper, it even performs like one for a while. However, mil thickness and material construction decide how long that performance lasts, and this is where most moisture problems in a crawl space begin.
Why 6-mil Poly Struggles When Protecting Your Crawl Space Vapor Barrier
A mil is one thousandth of an inch. Standard 6-mil poly is thin enough to tear on a root, a shard of old brick, or the knee of the next technician who crawls across it. Beyond that, thin unreinforced plastic degrades faster in a hot, humid environment where it stays in contact with damp soil year round. Once it tears or thins out, ground moisture flows straight through the gap, and the liner stops doing its job. The full breakdown of how 6 mil compares to 10 mil and heavier liners is worth reading before you let anyone roll out the cheapest option under your home.
How Reinforced and Heavy-Gauge Barriers Outperform Thin Plastic
Thicker liners in the 10 to 20 mil range resist punctures and dragging far better. Reinforced liners go a step further by sandwiching a woven cord layer between sheets of polyethylene, which stops small punctures from spreading into long tears. For a Charleston crawl space, where someone will eventually need to crawl back in for plumbing, HVAC, or inspection work, that durability matters as much as the vapor rating itself.
Material choice also interacts with your home's age and layout. A tight historic crawl space with brick piers, debris, and uneven soil punishes thin plastic quickly. For example, a liner that performs fine under a newer slab-adjacent crawl space can fail within a season under an 1890s peninsula home. The comparison of polyethylene, reinforced, and heavy-gauge liners walks through how each category handles those conditions.
To put it simply, the liner is the cheapest part of the job and the worst place to cut corners. Labor to install a thin liner costs roughly the same as labor to install a durable one. The difference shows up a few years later, when one barrier still seals the soil and the other lies in shreds.
Seams, Fastening, and Proper Vapor Barrier Installation
Material gets most of the attention, but installation quality separates a system that works from a plastic sheet that merely covers the dirt. A barrier with open seams, loose edges, and bare strips of soil leaks moisture almost as freely as having no protection at all.
What a proper installation includes
A real installation starts before the plastic comes off the truck. The crew removes debris, old insulation fragments, and sharp objects from the soil. Then they fit the liner to the actual shape of the crawl space, cutting around piers rather than draping loosely over them. Seams overlap by a generous margin and get sealed with vapor barrier tape rated for the job, not general-purpose duct tape that releases in humidity. Edges run up piers and, in full encapsulation work, up the foundation walls, with mechanical fasteners holding them in place. The vapor barrier installation service page describes this process in more detail for Charleston homes.
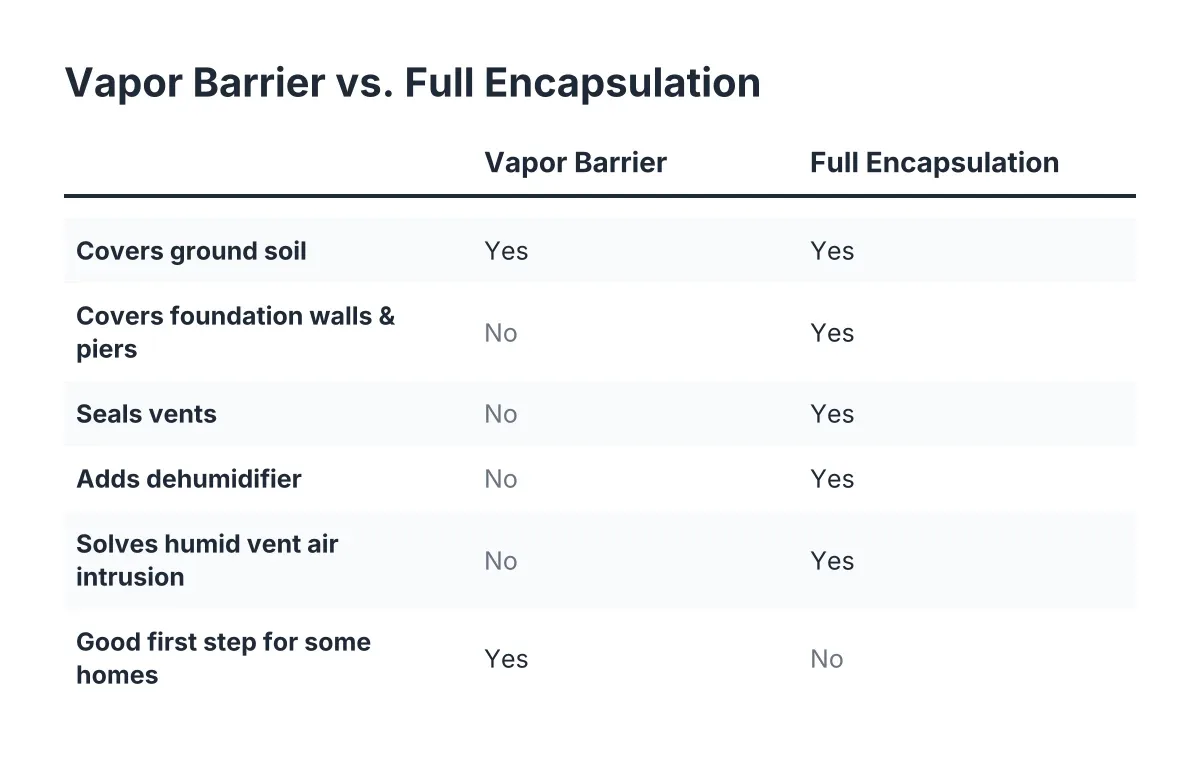
This is also where the question of full encapsulation comes in. A floor-only barrier blocks ground moisture. Encapsulation seals the entire crawl space, including walls and vents, and usually pairs with a dehumidifier. In a vented Charleston crawl space, a floor liner is a strong first step, but humid outside air can still enter through the vents. Which approach fits your home depends on your moisture readings, your foundation type, and your budget.
Signs your current barrier is failing
If your home already has one installed, check it before assuming you are covered. Warning signs include visible tears or punctures, seams that have pulled apart, standing water pooling on top of the plastic, soil showing through gaps, and a persistent musty smell upstairs. Condensation on the top surface of the liner also signals that humid air is still circulating below your floor. The EPA's guidance on moisture control in homes is a useful reference for why these symptoms deserve attention rather than a shrug.
As for what a crawl space vapor barrier costs, no honest number fits every house. Square footage, access, debris removal, liner thickness, and whether you stop at a floor barrier or move toward encapsulation all move the total. The vapor barrier cost guide breaks down each of those drivers so you can read a quote with confidence. DIY installation is possible for a simple, accessible crawl space, but tight historic foundations, wet soil, and sealing details push most Charleston homeowners toward professional work. Either way, ask any contractor to show you their seam, taping, and fastening methods before you sign.
Ready to Get Started?
Low Country Crawl Space Repair installs vapor barriers and provides encapsulation, moisture control, drainage, and crawl space repair for homeowners in Charleston and its surrounding communities. If you are not sure whether your current barrier is adequate, or your crawl space has never had one, we can inspect it and walk you through your options. Call us or send a request to set up a crawl space inspection.